


Home Bar: Part 1
Here’s how I moved an existing electrical outlet in my home to a different location, while also adding a completely new outlet as well.
Note: I am not a professional/licensed electrician. I recommend consulting a local licensed electrician prior to doing any work on your home.
This is gonna sound weird, but the “tool” that was the most helpful in moving/adding these outlets for my home bar project has been my laptop.
I taught myself how to 3D model my projects on a free website and it has single-handedly saved me from making so many mistakes that it was so worth the hours I put in to learning it. It allows me to build out an exact real-life-dimensioned replica of the room that my project is going in, along with any existing obstacles.


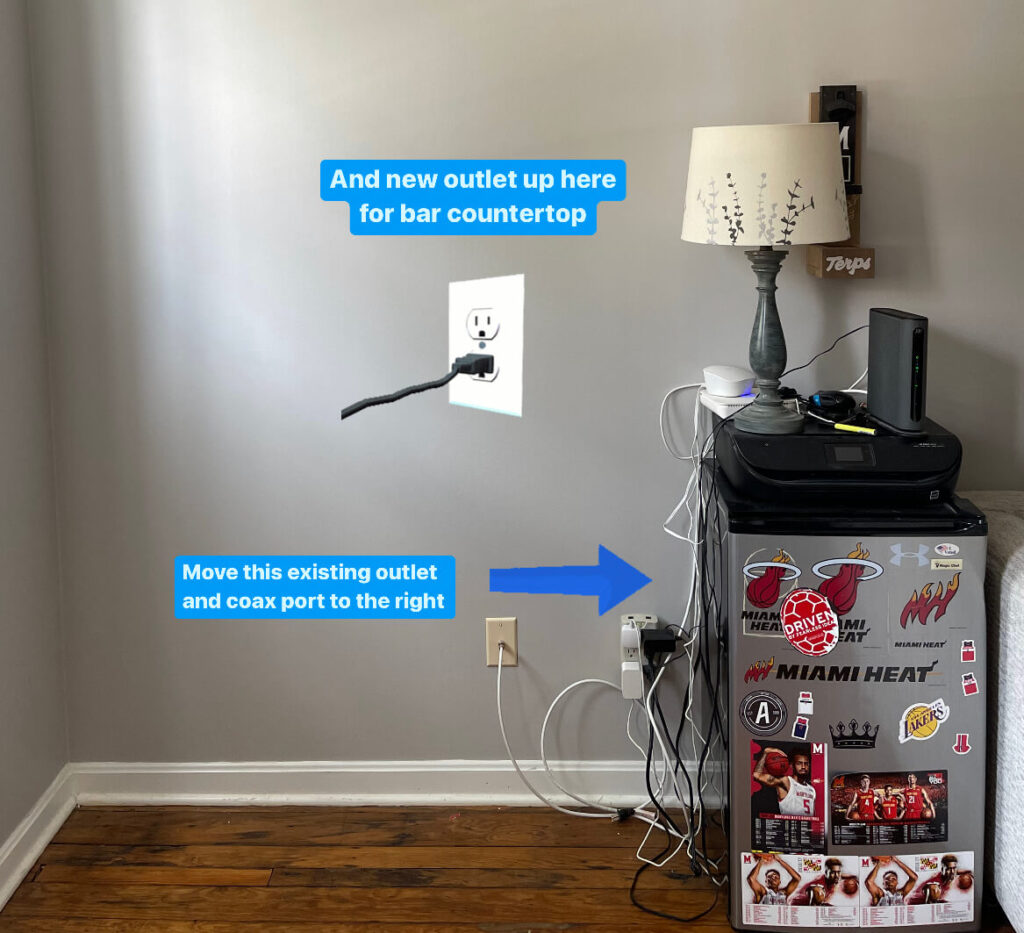
And so when I was building the 3D model of my bar, guess what I noticed? I now have to move an existing outlet and coax port prior to building my own custom cabinets. Let’s get into how I did it.
The Plan
Initially I was annoyed that I now had to take an extra step to do all this electrical work. But the more I thought about it, it was a blessing in disguise. I’m already doing electrical, so I might as well do it right and add another outlet for the bar countertop. That way we can easily plug in appliances and get really crafty with our adult beverage creations. You know…priorities and what not.
Step 1: Locate Breaker for This Outlet
I need to locate the breaker that this existing outlet is on and shut it off before I do anything. To do that, I use my voltage tester and stick it in the outlet. It turns red when it picks up an electrical current and green when it doesn’t.
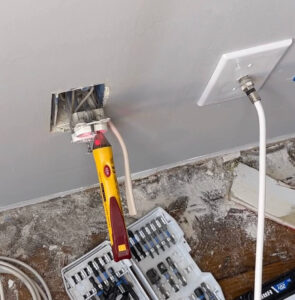
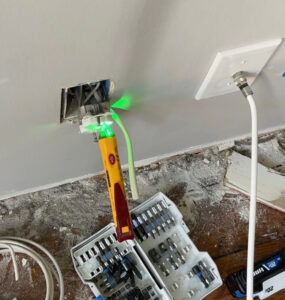
Now that I located the correct breaker by confirming the voltage tester is green, I can comfortably work on moving the electrical knowing I’m no longer at risk of being shocked.
Step 2: Assess Where the Wires are Coming From
What’s going on in my mind now is where are the wires *coming* from? The left? Right? Up? Down? This will determine if I’ll have the slack to simply shift the outlet over to the right or if I have to get more creative. Turns out…I have to get more creative.
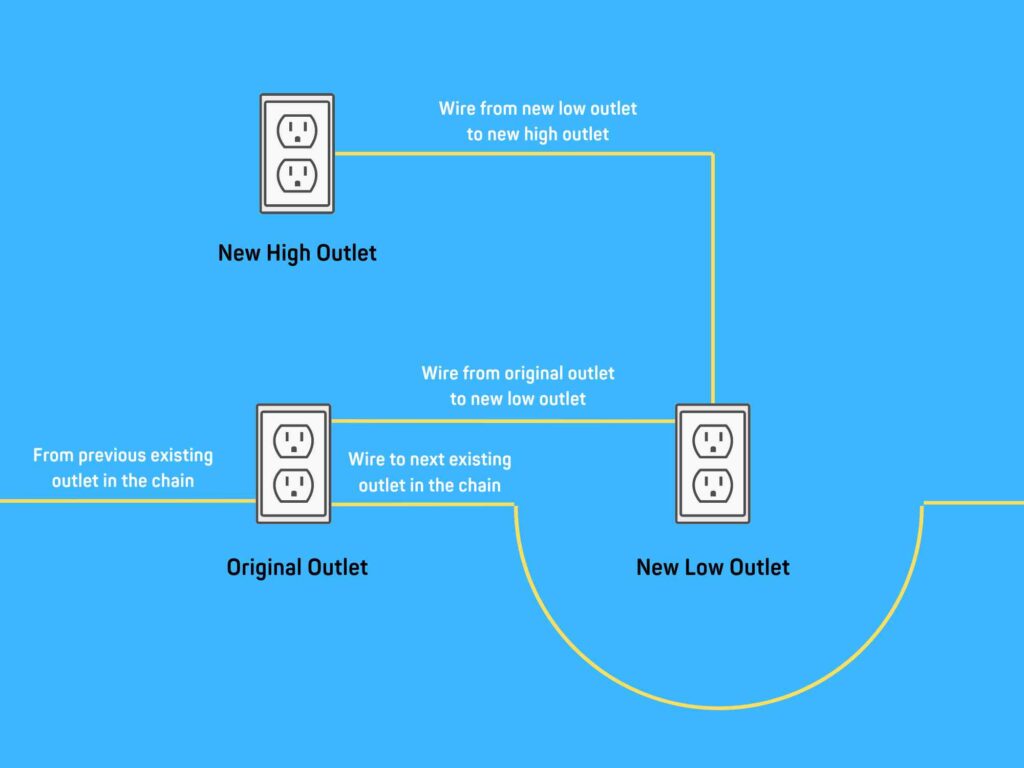
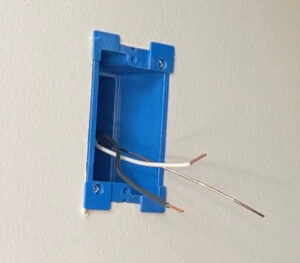
The current outlet has two wires in it. One coming in from the left from the previous outlet in the chain and one going out to the right onto the next outlet in the chain. Bad news: shifting it over is no longer an option. Good news: I have a better idea.
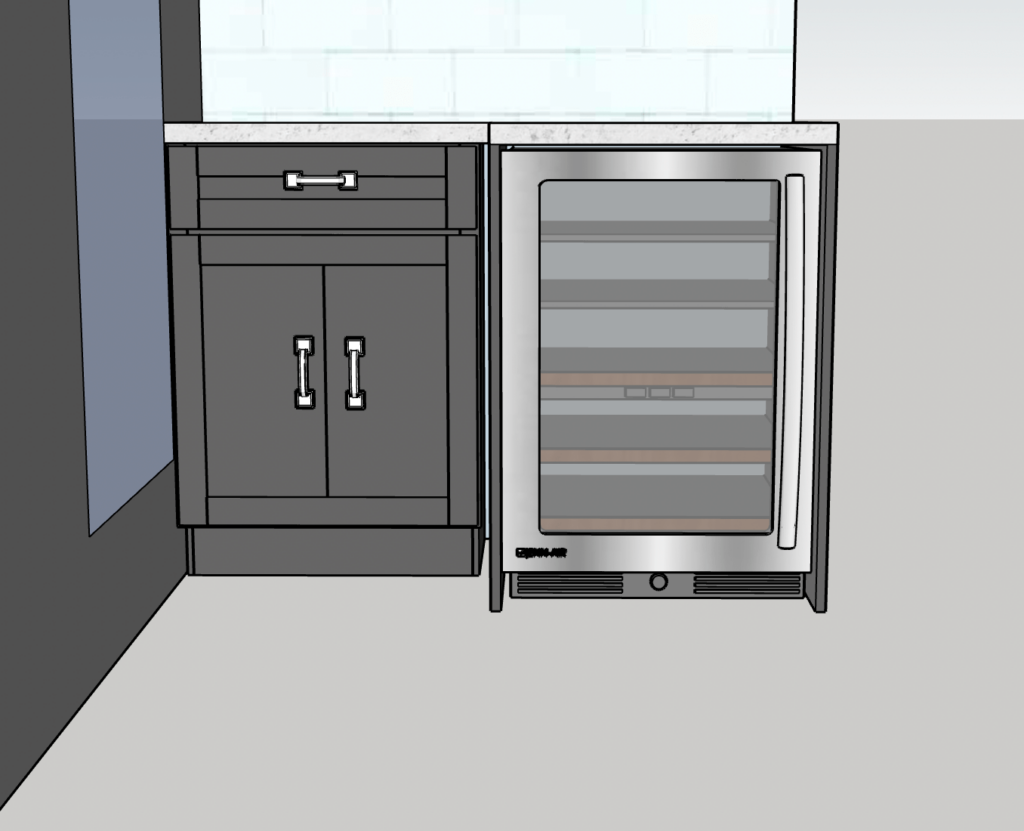
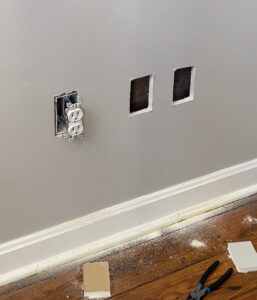
As you can see above in my 3D model of the bar I’m building, there will be a built-in beverage refrigerator. Funnily enough, this needs power (crazy right?). So now the plan is to keep the existing outlet where it is which will be behind the beverage fridge, add a new outlet to the right (outside of the bar), and add another new outlet at countertop height. Oh and still move the existing coax port (that’s behind the new fridge) to the right as well for our internet router. But that part was easy. All I had to do was unscrew it and move the coax over. So for the sake of this, we’re gonna pretend it isn’t there. Anyways, let’s get to these outlets.
Step 3: Cut Drywall for New Outlets
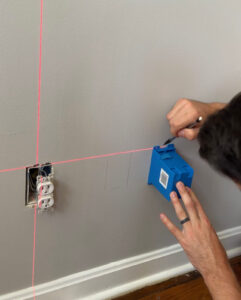
In order to add new outlets, I need to cut the openings for the new outlet boxes. I use my affordable self-leveling laser level and position the laser to the top of the current outlet opening. Then I grab my new outlet box and mark an outline of the box on the drywall with a pencil so that the top will align with the current outlet. I mark another outline for the coax port using the same method. Then I outline another box for above the countertop. Easy stuff right here.
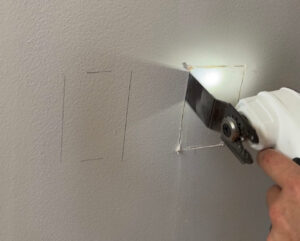
Now I bang out my ole trusty multi-tool and go to work to cut out the outlines. You can also use a drywall knife too, but the multi-tool is more fun and quicker/easier. If you’re worried about hitting potential wires/pipes behind the wall, use a drywall saw.
Step 4: Running the Wires
This part *can* be pretty difficult, I’m not gonna lie. But before I get into how I run the wires, let’s get into what wires I need to run in the first place.
Which Type of Wire to Use
So the first thing I need to do is figure out if I’m adding my new outlet to a 15-Amp or a 20-Amp circuit. How do I know? I look at the breaker switch that my current outlet is on and it tells me. Most outlets are on a 15-Amp circuit, but I always check to be sure. In my case, it is a 15-Amp circuit.
A tell tale sign too is if your outlet has this horizontal line on it, then it’s *probably* on a 20-Amp circuit.
Now…what kind of wire do I need?
If I have a 15-Amp circuit, then I need 14-gauge wire. If I have a 20-Amp circuit, then I need 12-gauge wire (note: the lower the gauge, the thicker the wire). So in my case, I’m installing my outlet on a 15-Amp circuit and so I’m using 14-2 wire.
Oh what’s the “2” in “14-2 wire” mean you ask?
Well the “2” means there are two conducting wires (white & black + the ground wire of course). If you get 14-3 wire then you are getting 14-gauge wire with 3 conducting wires (white, black, & red). The red wire is essentially another hot wire like the black and they share the neutral (white) wire. This is used for wiring 3-way switches, which is not important right now, but now you know!
Essentially, what you need is either 14-2 wire (more likely) or 12-2 wire – based on the amperage of your circuit.
Now that I know what wire I need, let’s get into the fun part.
How to Run the Wire
I need to now run a wire from my existing outlet to the new outlet down low. And then another wire from the new outlet down low to the new outlet above the countertop. This can be really easy or a little more…shall we say…involved.
Depending on what’s behind the wall and how far apart you’re adding a new outlet, you may need to use a wire snake to help pull the wire behind your wall from outlet to outlet. You may also have to drill through a stud too, which you can do with a long flexible drill bit to fish the wire through. Totally doable, you just need the tools to make it happen. Luckily for me, I didn’t have to do any of this because my outlets were within the same stud bay.
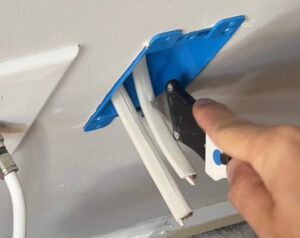
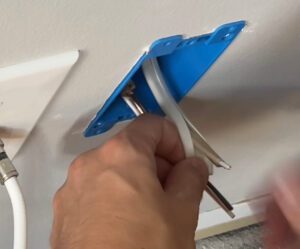
Other than that though, it really is simple. I run my wires from outlet opening to outlet opening through the designated slots in the electrical box and ensure I have at least 6 inches of wire inside the box to play with.
I always make sure I run your feed my wire through my outlet boxes BEFORE I screw them down and install them. It’s much easier that way.
Note: if you’re using a metal box, then you need to use a knockout wire clamp. This prevents the wire from rubbing against the sharp metal of the electrical box and potentially fraying. As well as keeping the wire in place.
Step 5: Install Outlet Boxes
READ THIS STEP: THIS CAN SAVE YOUR F–KING ASS.
Electrical Box Volume Calculation
This was something I had no idea about until several people commented on one of my viral videos on Instagram/TikTok – so pay attention.
There is a limit on how many wires/devices that you can put into an electrical box based on the volume of the box. This is what I use to calculate it and it’s pretty simple to do. The reason there is a code for this is because you don’t want to overstuff too many wires into a box. If you do, you risk bad things happening.
So make sure to use these calculations. For context, this is what I plugged in for the existing outlet and my new outlets, respectively.
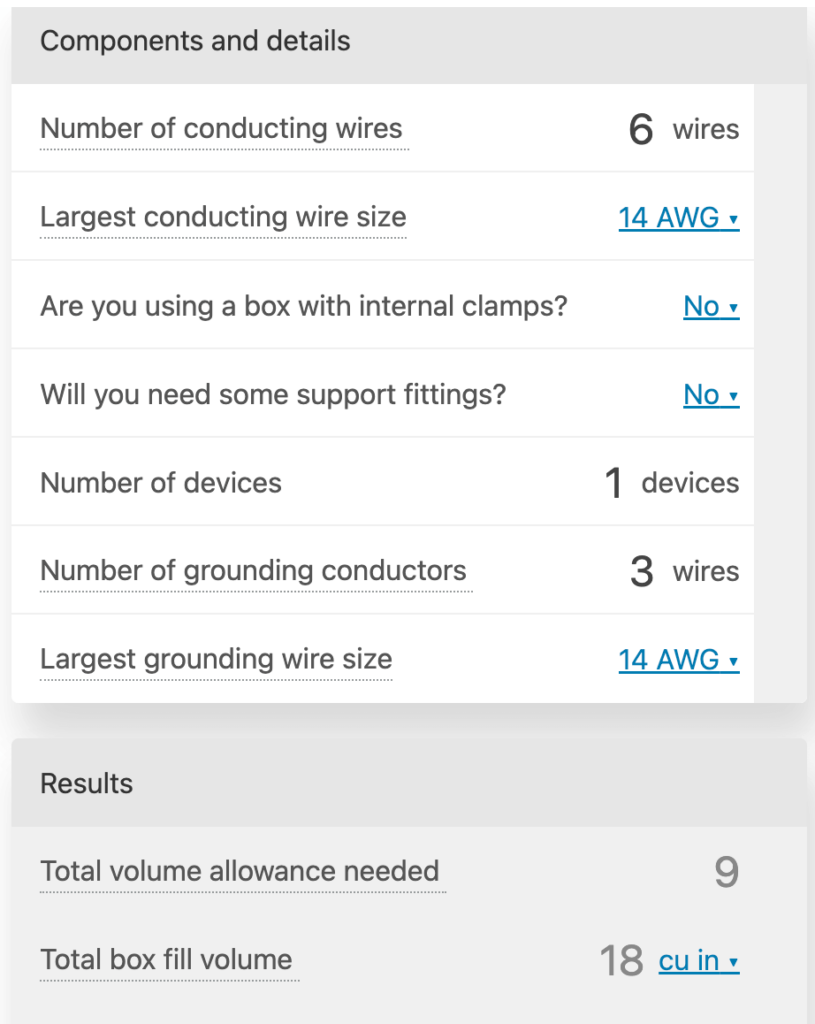
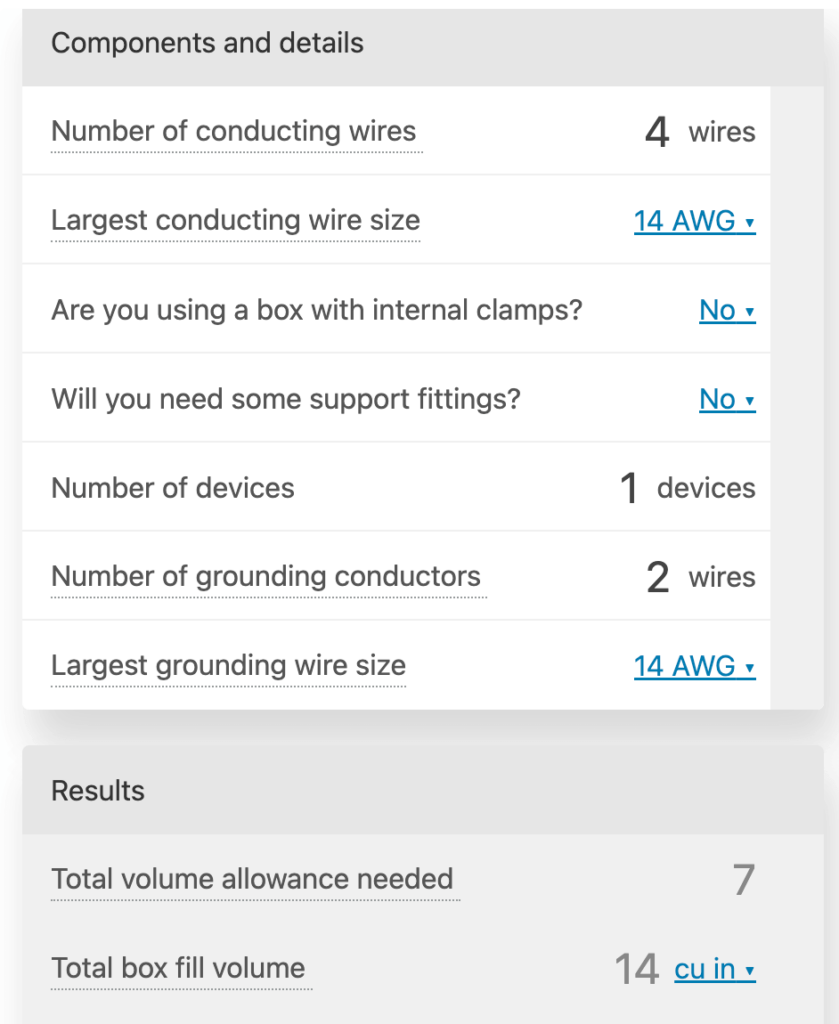
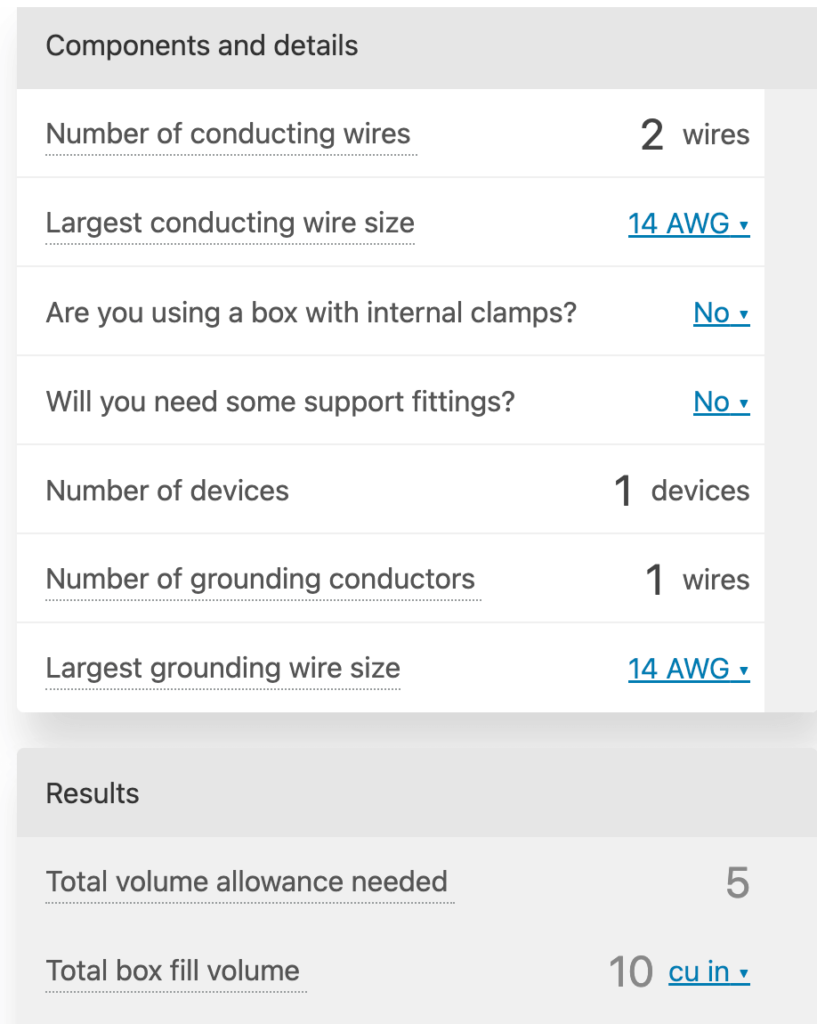
The website that I linked above will explain how to use this calculator, but essentially the number of conducting wires consists of every white wire (neutral) AND black wire (hot) that will be in your electrical box. Wire size is self-explanatory. Old work boxes don’t need internal clamps or support fittings. Devices are your outlets, light switches, etc. And then the grounding conductors are the number of ground wires. Simple, right?
Because of these calculations, I’m using a 14 cubic inch old work box for my the two new outlets that I’m installing and an 18 cubic inch old work box for my existing outlet (which it already was, thankfully).
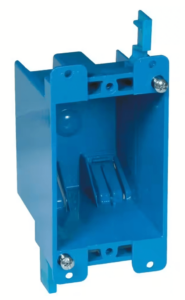
Old Work Boxes
When it comes to installing the outlet boxes, it’s quite simple. But there’s some important tips to make sure you’re doing it right and as easily as possible. First things first, use “old” electrical work boxes.
Typically, electrical work boxes are mounted to studs behind your wall – these are called new work boxes. Unfortunately, that’s not very feasible in situations like these for two reasons.
One: You can’t really install outlets to a stud if the drywall is already up. You kinda need room to be able to drive the nails/screws in. If you want to rip off a bunch of drywall, install the outlet to a stud, patch the drywall, and repaint: go for it. Just know I’ll finish much faster and will be approximately 6 beers deep by the time you even mount your outlet; let alone all the patching/painting.
Two: Having to install your outlet to a stud severely limits your placement of your new outlet. And that’s no fun. Let your imagination run wild with unlimited outlet location possibilities.
Okay cool. So how do these old work boxes get attached then?
The old work boxes install by these little “wings” that as you screw them down, they grab onto the drywall from behind and secure it in place. I know it’s hard to picture, but just trust me: it works, it’s sturdy as hell, and it’s really easy to install. It will feel like a cheat code when you do it, but this is a very common solution and chances are you already have one behind the walls in your home if there was a renovation project at some point.
Step 6: Wiring the Outlets
This is the scariest part if you’ve never done it before – as it should be. Electricity is no f–king joke. But the good thing is it really is quite simple when you boil it down.
Stripping the Wires
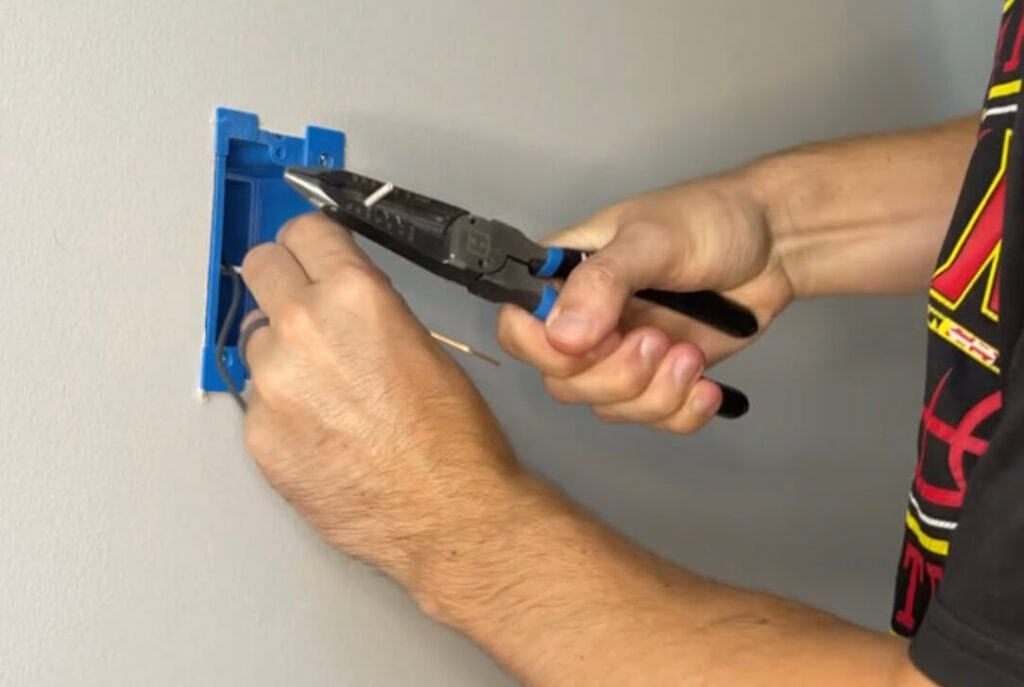
After pulling the wires to the boxes, I needed to strip them of their sheathing to expose the copper. I use my utility knife and run it down the sheathing to create a slit. Then I just peel it open to expose the 3 wires and grab my wire cutters.
My wire cutters have designated slots based on different wire gauges (size of wire) to strip wires. I slip the white wire into the 14-gauge slot, give it a wiggle, then slide the white sheathing off in order to expose about 3/4″ of copper. I do the same with the black wire.
Now I’m ready to wire up the outlets.
Wiring the Outlets
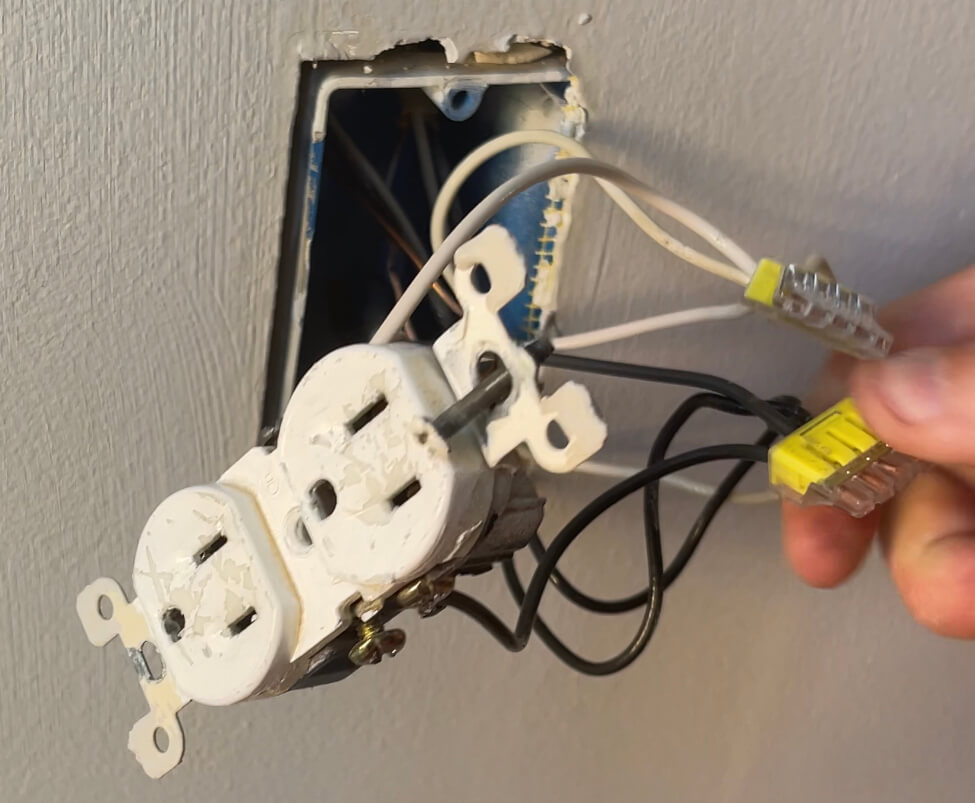
I now have all the wires pulled and all the electrical boxes installed. Each of my outlets will wire up a little differently, but the process is all the same.
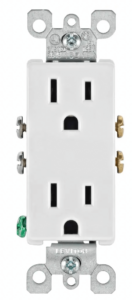
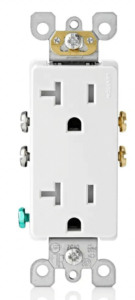
An outlet device looks intimidating, but I promise it’s not. They have two sets of screws: one side has 2 silver screws and one side has 2 gold screws. Then there’s a lonely little green screw too. The silver screws get the white (neutral) wires and the gold screws get the black (hot) wires. And the ground (bare copper) wire goes to the green screw.
Now let’s wire these suckers…
Wiring an Outlet with One Wire
The new high outlet only has one wire coming in, which makes my job reaaally easy.
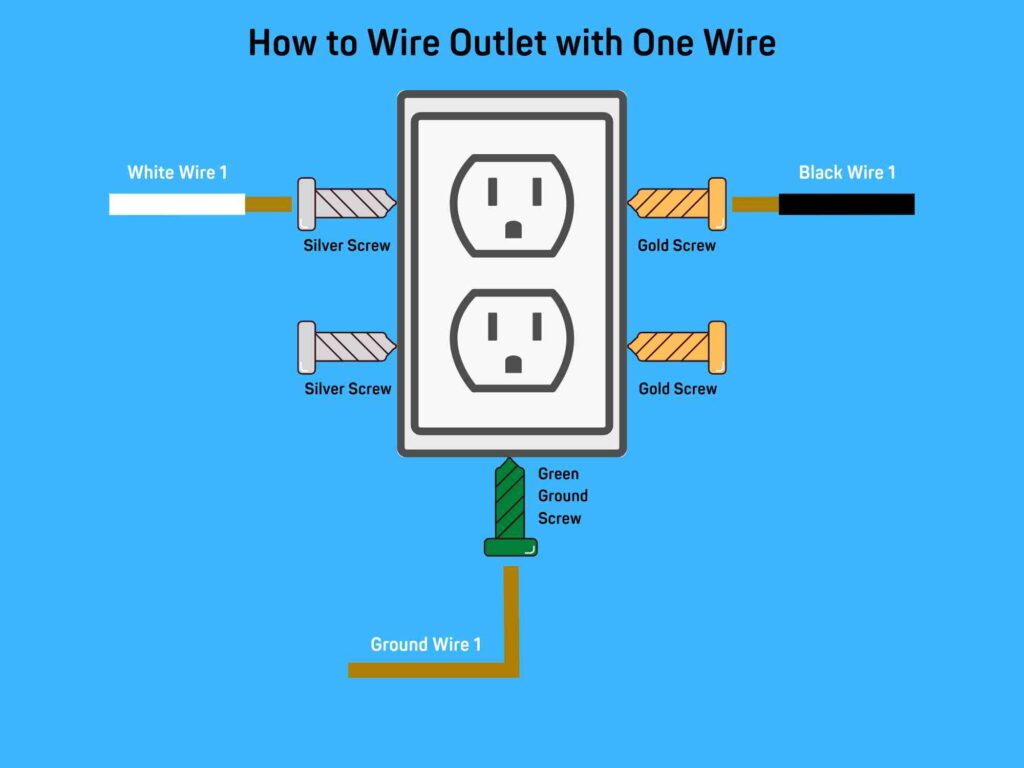
With only one wire coming in, all I have to do is install the ground to the green screw, white to the silver screw, and black to the gold screw. Whether you install the white/black on the top set of screws or bottom set, it doesn’t matter (unless it’s a GFCI outlet: in which case follow the simple instructions you’re given for proper wire alignment).
To install the wires to the outlet screws properly, I create a clockwise hook/loop with the wire. Then I hook the wires around the screw and tighten the screw down. I repeat for every wire on its designated screw.
Note: you install a clockwise loop so that when you turn/tighten the screw, the loop closes and tightens. If you install a counter-clockwise loop, it has a tendency to loosen as you tighten the screw. You know…physics and what not.
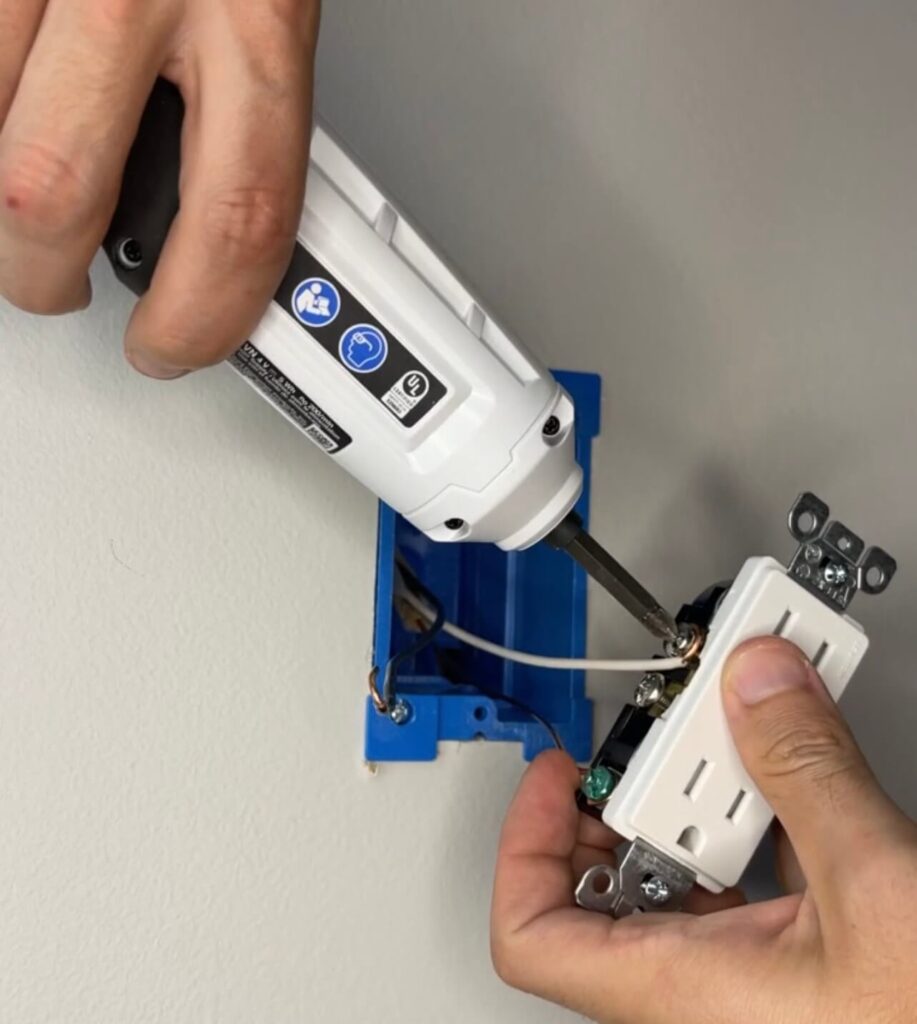
After that, I screw down the outlet to the electrical box with the top and bottom screws and then I install the cover plate. And that’s it. One outlet down, two to go.
Wiring an Outlet with Two Wires
The new low outlet has two wires in it, so what do I do here?
The same thing basically. The only difference is now I have one set of black/white wires on the top set of the corresponding silver/gold screws. And another set of black/white wires on the bottom set of the corresponding silver/gold screws. Again, it doesn’t matter which set of wires goes on top or bottom (unless it’s a GFCI).
Oh but what about the green ground screw?? Do I put both ground wires to it? Kinda.
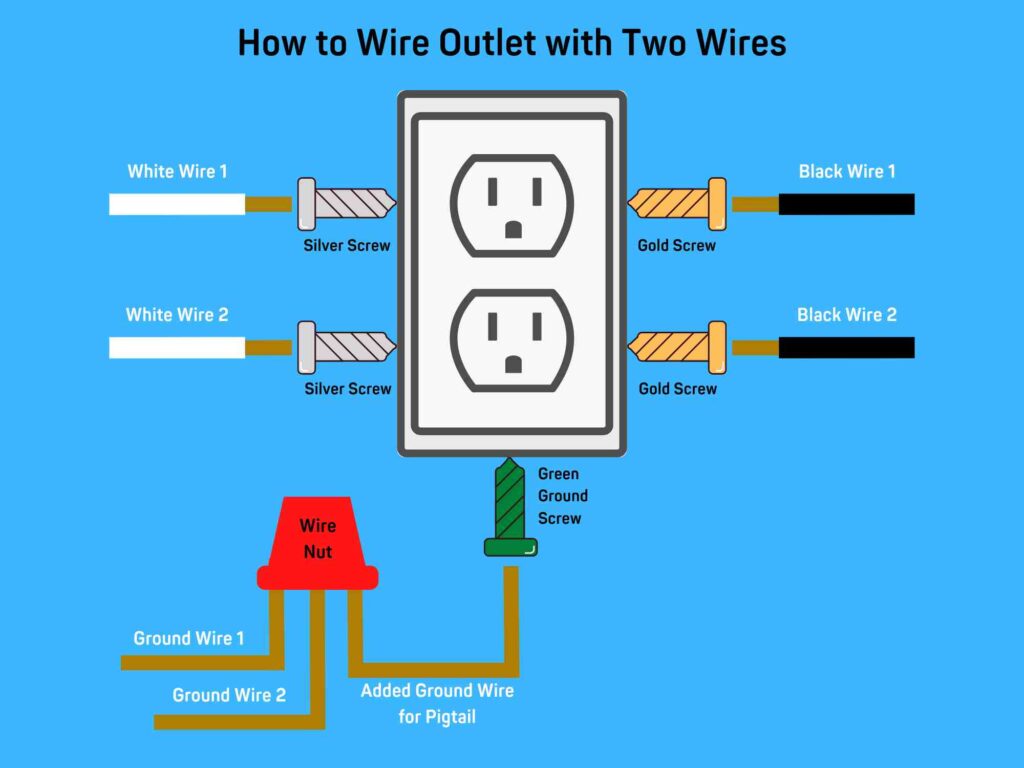
I have to do what’s called “pigtailing”. There’s two ways that I will usually do this: either with a wire nut or with a Wago connector. I like Wago connectors, but the process is still the same. Essentially I need to take two wires and turn them into one connection point by introducing a third wire.
For the sake of visualization, let’s imagine a tree trunk with branches. I need to take the two branches (the grounds from my two 14-2 wires) and introduce a tree trunk (the third copper wire) to become the source of the nutrients (the electrical current) for all of its branches.
For a wire nut, I take the two ground wires and tightly twist the ends together. Then I take a third copper wire and twist that in as well. Once all three wires are twisted together, I twist on a wire nut to lock them all together. By connecting all of the wires together and screwing the third copper wire down onto the green ground screw on the outlet, all of the wires are now properly grounded.

Note: In this case I use a Wago connector to connect the wires. With Wago connectors you just insert the ends of the wires into the slots and it bites down on them, rather than twisting them together. I find them personally easier to use, but it’s all the same.
Wiring an Outlet with Three Wires
The original outlet is by far the hardest to wire since it has (3) wires coming in.
Since there’s only two silver/gold screws to accommodate three white/black wires, I now have to pigtail (4) white wires together, (4) black wires together, and (4) bare copper wires together in order to make this work.
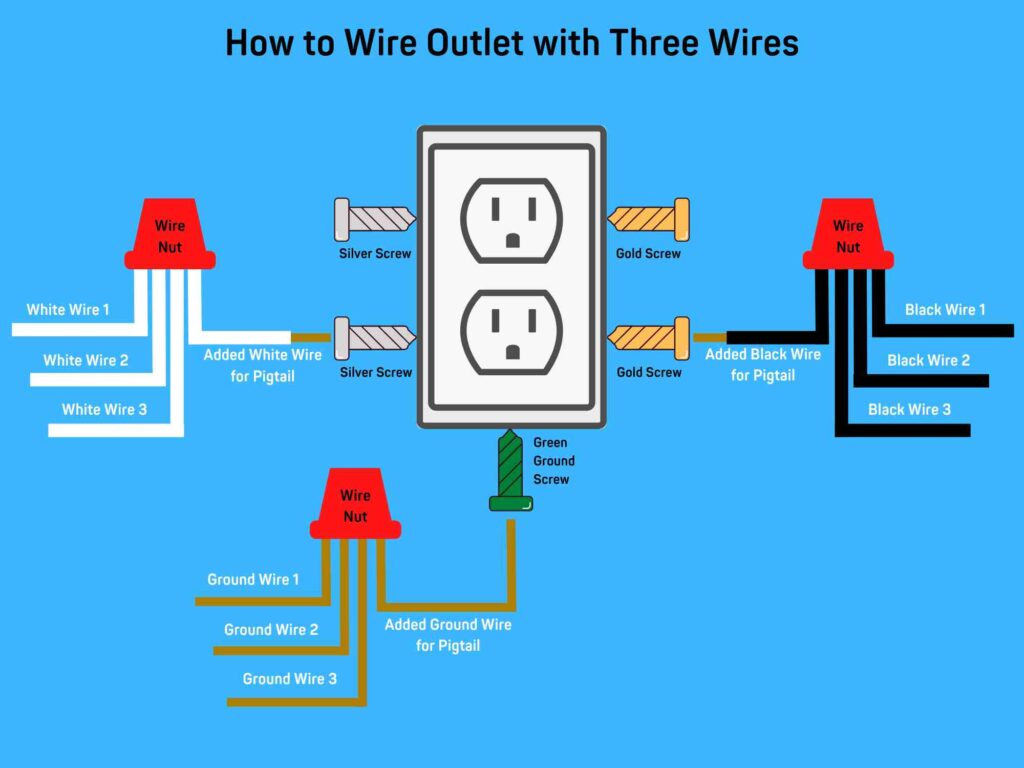
Essentially, I do the same process that I did for the ground wires in the “two wire” situation where I introduce an extra wire and pigtail them together. Once all 4 wires are pigtailed together, I tighten the extra wire to its respective screw as seen above.
By doing this, now all the white wires are connected to the silver screw, all black wires are connected to the gold screw, and all ground wires are connected to the green ground screw.
BAM.
It’s simple in theory, but it does honestly take some work to learn how to manipulate the wires so that they aren’t in the way. This is when it really helps to have a bigger electrical box with a lot of volume so that you have more room to operate. This is also why I like to use the Wago connectors. It’s easier for me to snap the wires in, rather than trying to twist 4 wires together in a tight space.
And now all my outlets are wired up and it’s time to test them!
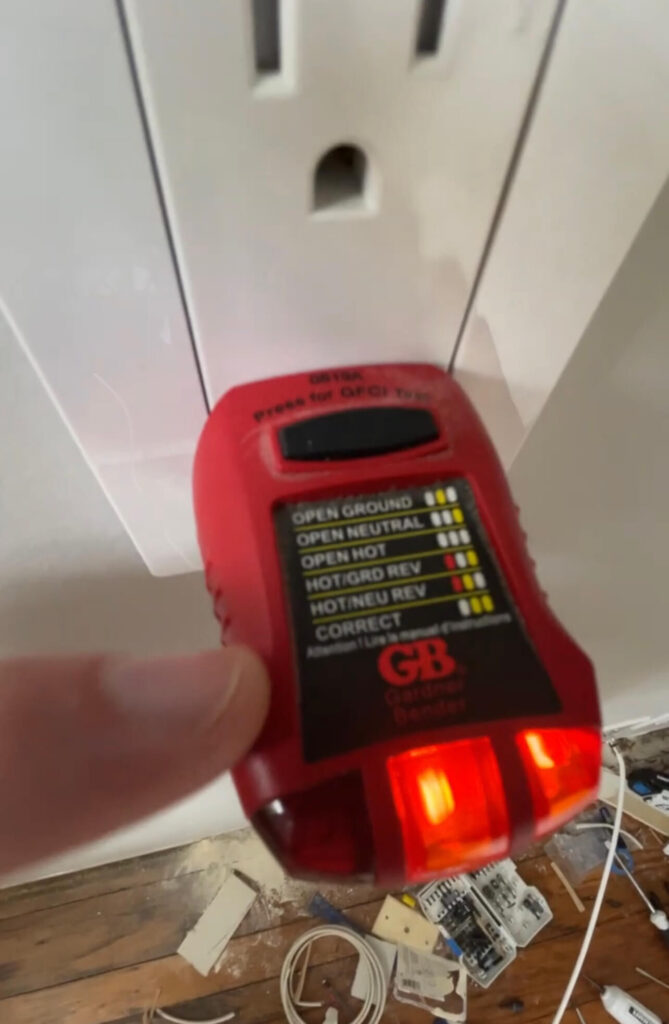
Step 7: Testing the Outlets
This is the part where I become a little kid on Christmas morning. There’s just something about electricity that is so rewarding and so I sprint to my breaker to turn it on so I can see if it worked.
I never test my outlets by simply plugging something in. That’s not good enough to know if you reaaaally wired them correctly and most importantly, safely.
I use my outlet tester to ensure that everything is wired up exactly as it should be.
And that’s that!
This is honestly a simple process. You just need your outlet virginity taken because I won’t lie to you that your first time is gonna take you longer than you expect. It’s funny cause it’s kinda the opposite of my first time I…..nevermind.
Anyways, we did it and Thomas Edison would be proud! Now go kick some ass in your home!
And in the meantime, go check out the next step of my home bar project: Building My Own Custom Cabinets.
